Sunday, November 21, 2010

Decision Time

Ok, I'm to the point where a critical decision needs to be made.  The frame, suspension, and drivelines are installed, cleaned, painted and assembled.  So one, maybe two decisions need to be made.  First, I can't do anything else without an engine or the body ready to go back on the frame.  If I decide to do the body first the final decision on the color.  I think I've decided to paint it the same color as dad's old car.  

 But I'm toying with the idea of putting a decal on it that is on our parts car.  Here's a picture of it.  Click on the picture for a larger view.
It has the stripes down the fender behind the door and "GT6" at the bottom with the stripe across the bottom.  I haven't seen it on any other cars I've looked at so I'm still deciding on whether or not it's original to the car.  And if I decide on doing the decal, what color do I do it?  
So, engine or body, and stripes or no.  

But while you're waiting for that decision, here's some pictures of what we've done so far.
Here's one of the new brake rotors.  One of the few parts I've purchased beyond bearings and stuff.
Here's the passenger side front assembly on the frame.  I am using the 5 gallon bucket as a stand and as you can see it's slid way over on the frame because the front assembly weighs a lot compared to the frame and it almost tipped over on me.
Here's a top view of it.  Even the spring is from the original car.  About 90% of the pieces have been individually wire-brushed or sand blasted then primed and painted.  That's one of the reasons why it takes a lot of time to get what seems like a little bit of work. 
Here's a picture of one of the rear brake assemblies before disassembly and cleaning.  The gear you see on the right side of the rear cylinder is a self adjusting mechanism that is unique to this year of car.  This is why I got the parts car.  It had 2 good rear assemblies that had this mechanism and my car only had one.  But it sure has been nice to salvage nuts and bolts off the other car and to seen how things go together.  It's already paid for itself.
Close up of the front assembly.  It looked like the picture above of the rear assembly before I got to it.  Not anymore!
Here's the frame with transmission, drivetrain, differential, and rear suspension and braking.  Looks good if you ask me.
Here's a view of the front.  Now the bucket is in the center again because both sides are on and it's balanced.  The wood block is there to support the transmission.
Transmission cleaned with new gaskets and mounts.  I did not paint the transmission, it cleaned up nice with just a wire wheel and toothbrush.
Here's it's on the car.  It's small compared to modern transmissions.
And here's the rear differential.  Didn't paint it either.  
So there's an update.  Sorry it's been so long, but things have been busy around here.

Wednesday, September 1, 2010

Progress

So I've kind of stalled out lately.  It's been a busy summer and I've hit a few snags.  I was working on the rear suspension and stuff and discovered that I've got different sized axles and brakes.  Then I started working on the front suspension and got a lot done until I found I need new rotors and I'm waiting to order those.  So I started working on the transmission and driveline.  Got that done and on the frame.  So I've had a lot of time to think about what I'm going to do.  Then I realized that after I get the suspension done and the rear part of the drivetrain together the next step is either the engine or the body.  And since those are pretty big steps I stalled out.  

Ever since I found the problem with the rear end I've been casually looking to see if I can find a solution.   I've spent lots of time on the phone, posting questions to forums, looking at classifieds, ebay, and whatever else you can think of.  Opportunites came up and even a few parts cars.  Lindsay and I have gone to look at a few and then we found a guy that had 2 GT6's an hour away.  So we thought we'd go up and take a look.  He was asking $2000 for both.  The first one we looked at was maybe a 5 out of 10.  The body looked good, it had the rare overdrive option, but he said the engine was frozen and it didn't have the same rear end pieces that I need.  The other was maybe a 3 out of 10.  It had been rear ended so the body was pretty much toast.  The interior was unusable as well.  But when I peaked under the car it looked like it had the rear end pieces I need!  I wasn't quite sure and I couldn't get in a position to take the wheels off to get a better look.  So I started looking at the rest of the car to see what else would be usable.  It looked promising so I asked if he would split the cars and he said yes, then I made him a low-ball offer of $300.  He said $350 and I said sold.
Here's the car.  

During my research I found I could get all the pieces I need, but Mk 1 rear end pieces, for $450 to $500 before shipping.  So I figured $350 for a whole car that might have the pieces I need is worth it.  

Tonight I pulled the rear wheels off and guess what I found...
It has the same setup as my car!  HOORAY!!  Now I can finish up the rear of the car.  That is so cool.  

Another reason I bought the car was so I can use it as a cheat sheet on how to put everything back on my car.  In all the hubub and excitement of taking everthing apart I kind of forgot a few things, so it will be nice to be able to take a peek at the parts car.  Plus I now have an endless supply of nuts and bolts that I can scavenge.  It's going to be great.  
This car has a cool decal setup on it.  I think it's pretty cool.  It says GT6 in front of the rear wheel and has the stripes up the back of the door.  I think I might try to incorporate that into the finished product and maybe even try to find some original decals somewhere.  But I'm getting way ahead of myself.  
I asked the guy about the engine and he said he didn't know, but it does rotate so it's not frozen.  That's a good sign.  So I might be able to get some money for the engine or maybe even use it.  We'll see.  Bryce think's it needs to be fixed and he told me that he would fix it after I left.
So, all-in-all it's going to be fun.  I'll be able to finish up the rear part of the car and get that done.  I'm so excited and I just can't hide it.  Now if I just had more time to be a grease monkey it would be great.  Maybe this winter.  We'll see.

Thursday, July 29, 2010

Work Has Resumed!

So I've got more to share on the progress of the awesome car.  I've been working on the suspension and driveline.  The engine is still in pieces so I've started putting stuff back on the frame.  So I decided to start at the rear and work my way forward.  The process is basically scrape or sandblast the old dirt, oil, grease, and paint off the pieces, prime and paint, then put them back on. 
Here is a picture of the rear differential.  This was hard to clean.  As you can see by the amount of dirt and grime on the work area there was a lot caked on.  I can't use the sand blaster on the parts that have little moving parts because the sand gets everywhere.  So a lot of this I have to do by hand with a wire wheel attached to a drill or with wire brushes and a flat head screwdriver.  It's fun!
Here's my paint table.  The long skinny grey piece is my driveline.  My brake caliper is on the top left and the rest are front suspension pieces.  Good thing it's been nice here lately so I can paint outside.
Here is one side of the front suspension.  You can see the brake rotor, the hub and all the connecting hardware.  When Bry came out and looked at stuff the other day he asked me if all of this was new.  I guess it must look ok then.
So here is what the rear end looks like so far.  The differential that is shown in the first picture is in the middle of everything.  This is a unique rear end because it only has 1 leaf spring setup for both rear wheels.  This is called a swing spring.  Sure does make it easy to work on.

Now the fun part.

If you look at the above picture you'll notice there are no axles or anywhere to put wheels. 

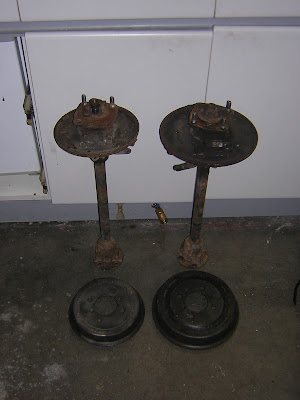
These are the axles and brakes that came off the car.  Both off the rear.  Notice anything peculiar?  Take a look at the drums in particular.  THEY ARE DIFFERENT SIZES AND NOT FROM THE SAME CAR!  

The setup on the right is what should be on my car.  The setup on the left is from a Spitfire.  The Spitfires aren't as cool as the GT6's therefore they have smaller brakes and weaker axles.  Now the great part about that is according to all the Triumph experts throughout the country (I've been on the phone with guys in Ohio, Pennsylvania, and Oregon) the original parts for my car do not exist anymore.  You can't find them anywhere unless you get lucky and find a parts car sitting around that has them.  Or you meet somebody in a back alley dressed as a salty sea dog.  Oh boy!
 If you look closely you can see the differences.  So the rear suspension has been put on hold for a little bit.
Here's the transmission.  It's tiny!  The bell housing is the "bell" shaped thing behind the transmission.  That's the part that holds the clutch and secures the transmission to the engine.  When I was taking it apart, I found a socket inside the bell housing!  I couldn't believe it.  It wasn't one of ours.  Weird.  I bet Inspector Clouseau didn't have sockets inside the bell housing of his Triumph.
Ok, maybe he did.
I wanted to replace the gaskets on the transmission so I took a peek inside.  Looks pretty good to me.  No metal shavings or worn gears.  Sweet.
So, that's where we're at.  It's a slow process, but I like the way it's turning out.  I just have to keep reminding myself of the possibilities.

Monday, May 3, 2010

Engine in Pieces

So I picked up another piece of the car today.  I got the engine back!  It's all there, but it's all in pieces.  It's a good thing I like LEGOS because this is going to be the mother of all lego builds.  I just need to find some good instructions.
Here's what the engine looked like when it came out of the car.  The blue you see is not factory Triumph engine paint.  So that tells us that this engine has been out of the car before and has been painted before.  
Another picture of what it used to look like.
Here's what it looks like now.  No paint.  No grease.  It's been sitting for a while so you can see a little surface rust.  That's no big deal, it will clean right up.
Here you can see the oil pan on the left, the block in the middle and the end tin pieces below the screwdrivers.  The box on the right has the valves and springs in it.  It's going to be fun to work on it while it's all clean.
Here's the refinished cam shaft.

Here's the refinished crank shaft.  All nice and pretty.
A shot of all the pieces.
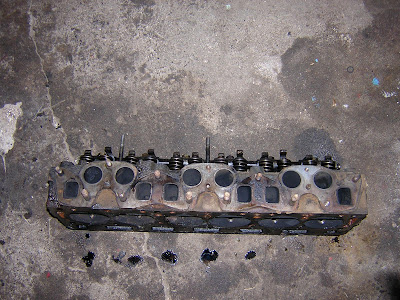
Here's what the head used to look like.
Here's the manifold side of the head.
Now it's all nice and spic and span.
Head on the bottom and crank shaft standing up.
And of course, a box full of the rest of the stuff.  Here you see the rockers, pistons, bearings, oil pump, timing chain and sprocket, nuts and bolts, and everything else. 

So I think there's going to be a little bit more machine work that we're going to need, but other than that, just a little bit of clean up and we can start putting it back together.  Going to be fun!


Tuesday, April 27, 2010

Frame!


So this is just going to be a quick update because not much has happened since the last post.  We took the engine to a local shop and had it cleaned and a little machine work done, but more is still needed, so we're waiting on that to put the engine back together.  The real update is we got the frame back from the powder coater!  It looks awesome!  I'm so excited to start putting the suspension and drive train back on the frame.  

This is my "let's get the frame off the trailer" look.  I think it needs some work.

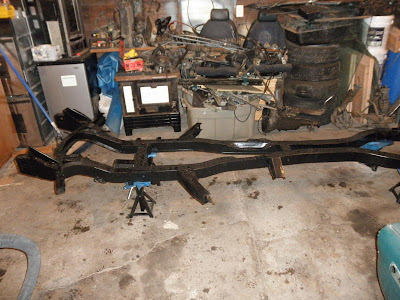
The new powder coated frame!  Looks awesome.


There's this thing in Washington called "rain."  It tends to get a lot of things wet.  


Here's a few of the motor mounts and suspension pieces we had powder coated as well.  I like it.


Now ALL this stuff (except the stove, but it would be cool to have a stove in the car) goes back on the awesome looking frame.  Do you think it will fit?  Do you think Bry remembers how it all goes back on?  I sure hope so!

Friday, February 26, 2010

Progress

So, this blog thing is not for me.  I can't remember what I posted last even though it's been one post.  So here's where I think I left it off:
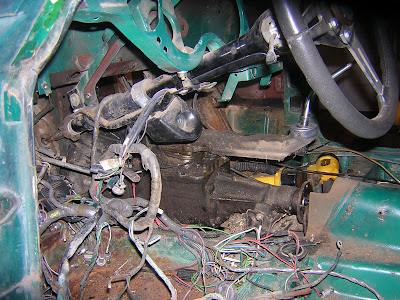
Looks like a mess, and it is.  This was the most time consuming process of the whole project so far.  There is so much crammed into the little dash, it's hard to tell what's going on.  Just wait until we have to put it back together.  That's going to be fun. 
As you can see we've got most of the interior out now.
 
Both doors are off, the windshield is out, and the rear hatch is off.  

 
Here's a view of the transmission (gear box) from inside the cab.  It was actually pretty light.  I lifted it out of the car by myself because I am so strong. 

 
Here's a view of the cramped garage.  On the left with the reflector is the hood, or the more correct British term is bonnet.  The 2 doors are below it, and the windshield is on the ground to the right.  If you look closely, the exhaust is hanging on the wall behind the broom but above the plywood.  We've had to be creative on where we put stuff.  Adds a little excitement.

 
Here's a close up view of the steering column.  Most of these pictures are taken so we can see how things go back together.  The awesomeness of digital photography is displayed.  

 
Here's a view of the driver's side floor.  You can see the clutch and brake pedals.  Very little rust.

 
So now everything is out of the interior of the car.  The sheet metal is in great shape.  The rust color you see is just flakes on the floor.  Structurally it feels pretty good.  We'll know for sure after it's sandblasted.

 
Another view of the stripped interior.  At this point, the body is ready to be separated from the frame.  This involves 12 bolts.  They came off with no problems and this is what we were left with:

 
This is what the car looks like without the body.  Just frame.  Bry and I were able to pick up the body, one on each side, and walk it out of the garage.  We set it down on the driveway.

 
The body itself is 9' long.  It was a bit heavy, but nothing we couldn't handle.  

 
Here's a view of the rear end of the car, or the fat butt as Bry would say.  It's got one leaf spring that supports both wheels for the suspension.  If you look close, you can see the shocks with coil springs on them.  Those are not stock.  Those were added by the previous owner.  I'm not sure why.  I wonder if they helped.

 
Here's a front view of the removed body.
It had been raining this week, so we decided to pull the frame out of the garage and put the body back in.  So we removed the rest of the components off the frame so we could take it out and put the body back in the garage.  Here's what it looked like moving the frame:


As you can see, the frame is pretty light.  Even though Bry is the beefcake, the frame couldn't have weighed more than 200 lbs.  Talk about easy.

 
Here's a view of the whole frame.  The next step for this is to have it sandblasted and powder coated.  It's going to look super nice when we're through with it.

 
Another view.

 
Our work space.  It's actually not as bad as it looks.  This was before cleanup.

 
RUSTY!!!!!