Ok. Time for an update on the TR6. I know dad's getting antsy so in order to squash an uprising here are more photos and stuff.
The interior is complete now. All that remains is securing a few pieces of carpet and done. I kept the driver's side carpet out for now so I don't get it too messy during my test drives. Below is the rear area. It's not really a seat, but if you had to you could throw a dog or small kid back there. There aren't any seat belts so... I don't think you could even fit your golf clubs back there. With the top down however, that's another story.
New door panels. They do look spiffy.
Seats are now in place. And with the seats in place, the cab got a lot smaller! I was thinking it wasn't that bad working in there when the seats weren't in yet, but now that they are it's pretty tight moving around.
Looking good!
With the interior coming together I was getting anxious to drive this thing. Obviously I couldn't until I got at least the driver's seat in. But now that it's in there's nothing stopping me except for Lakewood's finest (it's not registered). So I started working on fine tuning the engine. It starts and runs, fairly well actually for not being started for over 10 years. But there was a pesky fuel leak I just couldn't figure out. I changed all the fuel hoses and the o-rings that were in the vicinity of the leak but nothing fixed it. So for about the 5th time I pulled the carburetors off the car to take a look. I flipped one of them over and saw something I missed before...
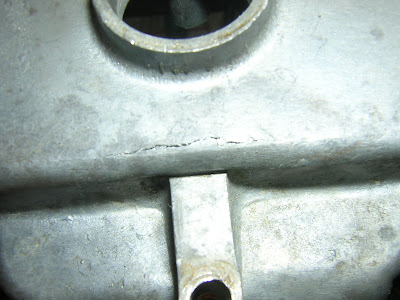
A crack! This is on the very bottom of the carb on the float bowl. Do you know how hard it would be to find a spare float bowl on 35+ year old Triumph Stromberg carbs? Very hard. So I started to weigh my options. I could weld it somehow. It's aluminum so it would be tricky to find someone that could do it. But I didn't know if it would seal correctly or interfere with the float mechanism. Then I had an idea. I ran out to my side yard to my parts car I bought for the GT6. I took a look at the carbs on that car to see if they were the same. They weren't. Same brand, but different size carbs. But the float bowls were the same size! So i cleaned it up and Ta-Dah! good as new. No more fuel leak.
Below you can see how bad the crack was. Don't ask me how it happened. My guess is they were dropped or something.
During my test drives of the car I noticed the rear suspension felt pretty rough. I pulled it back into the garage to see what was up. Below you can see the rear suspension setup. The spring on the right is the stock spring. The shock on the left is an upgrade from the factory shocks. But in order to install the upgrade 3 brackets needed to be installed on the car. Dad had a mechanic buddy install these for him. (We won't mention any names). The ride was stiff because the shocks were compressed all the way and were bottomed out. There was no give whatsoever.
I started doing some research and discovered that they were installed wrong. One of the brackets needed to go inside the trunk. In order to do that I had to remove the gas tank. Below is a picture of the trunk with the gas tank removed and you can see one of the brackets on the left.
Below is the correct installation for these shocks. Scroll up and look where the top of the shock was before and look where it is now. The bracket is bolted through the wall of the truck where before it was below the floor of the trunk. This gives the shock about 6 more inches of travel before it is fully collapsed and now it doesn't bottom out. And as you can see I've stiffened up the rear suspension even more by installing new rear springs. It's a fine ride now!
Here's another picture of the brackets installed in the trunk.
Good times! I just placed my last order of parts which should be here soon after Thanksgiving and I should be don with most everything soon!


