Friday, February 26, 2010

Progress

So, this blog thing is not for me.  I can't remember what I posted last even though it's been one post.  So here's where I think I left it off:
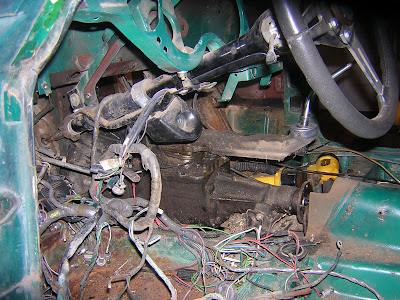
Looks like a mess, and it is.  This was the most time consuming process of the whole project so far.  There is so much crammed into the little dash, it's hard to tell what's going on.  Just wait until we have to put it back together.  That's going to be fun. 
As you can see we've got most of the interior out now.
 
Both doors are off, the windshield is out, and the rear hatch is off.  

 
Here's a view of the transmission (gear box) from inside the cab.  It was actually pretty light.  I lifted it out of the car by myself because I am so strong. 

 
Here's a view of the cramped garage.  On the left with the reflector is the hood, or the more correct British term is bonnet.  The 2 doors are below it, and the windshield is on the ground to the right.  If you look closely, the exhaust is hanging on the wall behind the broom but above the plywood.  We've had to be creative on where we put stuff.  Adds a little excitement.

 
Here's a close up view of the steering column.  Most of these pictures are taken so we can see how things go back together.  The awesomeness of digital photography is displayed.  

 
Here's a view of the driver's side floor.  You can see the clutch and brake pedals.  Very little rust.

 
So now everything is out of the interior of the car.  The sheet metal is in great shape.  The rust color you see is just flakes on the floor.  Structurally it feels pretty good.  We'll know for sure after it's sandblasted.

 
Another view of the stripped interior.  At this point, the body is ready to be separated from the frame.  This involves 12 bolts.  They came off with no problems and this is what we were left with:

 
This is what the car looks like without the body.  Just frame.  Bry and I were able to pick up the body, one on each side, and walk it out of the garage.  We set it down on the driveway.

 
The body itself is 9' long.  It was a bit heavy, but nothing we couldn't handle.  

 
Here's a view of the rear end of the car, or the fat butt as Bry would say.  It's got one leaf spring that supports both wheels for the suspension.  If you look close, you can see the shocks with coil springs on them.  Those are not stock.  Those were added by the previous owner.  I'm not sure why.  I wonder if they helped.

 
Here's a front view of the removed body.
It had been raining this week, so we decided to pull the frame out of the garage and put the body back in.  So we removed the rest of the components off the frame so we could take it out and put the body back in the garage.  Here's what it looked like moving the frame:


As you can see, the frame is pretty light.  Even though Bry is the beefcake, the frame couldn't have weighed more than 200 lbs.  Talk about easy.

 
Here's a view of the whole frame.  The next step for this is to have it sandblasted and powder coated.  It's going to look super nice when we're through with it.

 
Another view.

 
Our work space.  It's actually not as bad as it looks.  This was before cleanup.

 
RUSTY!!!!!

Sunday, February 14, 2010

Geting Started

So, I'm probably going to get as much guff from doing a blog as Brent did when he first bought a minivan, but I figured this was going to be the best way to document what we're doing to the GT6 as well as let us give dad a play by play version.  

If you want to see larger versions of any of the pictures, just click on it and it will open larger.
Bryce came out and decided he wanted to help.  Can't you just see him driving super fast in this car?  He already knows the face you need to make to help get all the horses out and on the road.
 
So we started by lifting the car and putting it on jack stands and taking the wheels off.  The great thing about this car is that the whole front part of the body is the hood.  It all came off as one piece.  This is a view of the engine bay before we started taking things off. 
 
This gives you a view of how simple the car is and how easy it is going to be to work on it.
  
This is the gas tank and the rear hatch area.  Typically this would be the place to find rust on a car like this, but it looks pretty good.  The gas tank has had gas in it for over 12 years, so we took it out and drained it to get a better look inside, and it looks like we'll be able to keep using it.

 
The radiator is another story.  The coolant inside the engine block and inside the overflow bottle looked great, almost new but once we drained the water in the radiator, it was about the color of an old penny.  We're going to flush it and then flush it again, and then we'll be able to tell if we need a new one or not.
 
Here Bry is getting ready to pull the engine.  The rockers look good.
 
Because the hood came off in one piece, we don't have to lift the engine very high to get it out of the car. 
 
Now you can see the size of the engine.  It came out piece of cake.
 
View of the engine bay without the engine.  As we've torn things apart it's apparent that somebody has unsuccessfully tried to do work on this car already.  Some of the suspension parts weren't even connected, and a few were with bailing wire.  Then I think of the stories Bry tells about driving fast and crazy when we had the car in Hinckley.  Good thing bailing wire is super awesome. 
 
Another view of the engine.
There was no gunk in the rockers and they all were moving well.  

 
The pistons didn't look too good.  The tops are all covered by gunk.  You can also see the holes next to the bolts.  Those are the holes the coolant circulates through to cool the engine.  Most of them are rusted shut.  It's going to be critical we get those cleaned out so the engine doesn't overheat. 
 
Everything moves very well.  The timing chain looks great, but we're going to replace it anyways.
 
Here's a view from the other side of the engine.  Again you can see the rust filled coolant passageways.
 
One surprising thing we found was that there was NO gasket between the head and the block.  We didn't find any trace of a gasket.  We did compression tests on all the cylinders before we separated the head from the block and we found 59psi, 30psi, 60psi, 32psi, 59psi, and 62psi for each cylinder 1-6.  Typically you should be getting above 125psi, so we're way off.  Hopefully that's because there was not head gasket.
 
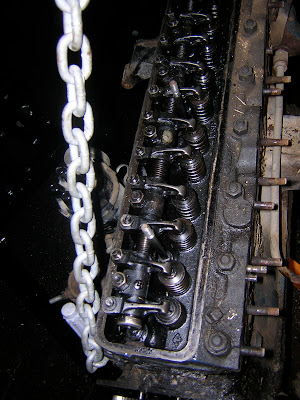
The head itself looks solid, but could use a good cleaning and rebuild.   
Looks a little different with no engine.  So we did a little demo on the interior as well.

 
We took the seats out and most of the trim.  All of the carpet is going to have to be replaced, the headliner as well.  The wood dash is in bad shape, but we are going to make our own.  They sell for about $300 online, ut we've got some good pieces of hardwood and Rick has all the tools we need so we should be ok. 
 
The good news is it's a tiny interior, so even though it all pretty much needs to be replaced, it's not a lot.
  
We did find some surface rust on the passenger side floor panel.  This is right under the battery and I'm thinking the seals under the hood weren't doing their job and let a little bit of water in.  Should be fine though.
 
So we've got a little ways to go before it looks like this, but this is the goal.  We'll keep you posted!